
%20--%3E%3Cmetadata%20xmlns%3Ardf%3D%22http%3A%2F%2Fwww.w3.org%2F1999%2F02%2F22-rdf-syntax-ns%23%22%20xmlns%3Axsi%3D%22http%3A%2F%2Fwww.w3.org%2F2001%2FXMLSchema-instance%22%20xmlns%3Adc%3D%22http%3A%2F%2Fpurl.org%2Fdc%2Felements%2F1.1%2F%22%20xmlns%3Adcterms%3D%22http%3A%2F%2Fpurl.org%2Fdc%2Fterms%2F%22%3E%3Crdf%3ARDF%3E%3Crdf%3ADescription%3E%3Cdc%3Atitle%3EWaves%3C%2Fdc%3Atitle%3E%3Cdc%3Acreator%3EDiceBear%3C%2Fdc%3Acreator%3E%3Cdc%3Asource%20xsi%3Atype%3D%22dcterms%3AURI%22%3Ehttps%3A%2F%2Fwww.dicebear.com%3C%2Fdc%3Asource%3E%3Cdcterms%3Alicense%20xsi%3Atype%3D%22dcterms%3AURI%22%3Ehttps%3A%2F%2Fcreativecommons.org%2Fpublicdomain%2Fzero%2F1.0%2F%3C%2Fdcterms%3Alicense%3E%3Cdc%3Arights%3E%E2%80%9CWaves%E2%80%9D%20(https%3A%2F%2Fwww.dicebear.com)%20by%20%E2%80%9CDiceBear%E2%80%9D%2C%20licensed%20under%20%E2%80%9CCC0%201.0%E2%80%9D%20(https%3A%2F%2Fcreativecommons.org%2Fpublicdomain%2Fzero%2F1.0%2F)%3C%2Fdc%3Arights%3E%3C%2Frdf%3ADescription%3E%3C%2Frdf%3ARDF%3E%3C%2Fmetadata%3E%3Cdefs%3E%3Cg%20id%3D%22layer-ripple-e49e13db%22%3E%3Cpath%20d%3D%22M0%2012c6%200%2012%2010%2018%2010s12-10%2018-10%2012%2010%2018%2010%2012-10%2018-10%2012%2010%2018%2010%2012-10%2018-10%2012%2010%2018%2010%2012-10%2018-10%2012%2010%2018%2010%2012-10%2018-10%2012%206%2020%205v113H0Z%22%20fill%3D%22%23ffffff%22%2F%3E%3C%2Fg%3E%3Cg%20id%3D%22layer-rolling-e49e13db%22%3E%3Cpath%20d%3D%22M0%208c12%200%2023%2016%2035%2016S58%208%2070%208s23%2016%2035%2016%2023-16%2035-16%2023%2016%2035%2016c8%200%2017-8%2025-10v116H0Z%22%20fill%3D%22%23ffffff%22%2F%3E%3C%2Fg%3E%3Cg%20id%3D%22layer-calm-e49e13db%22%3E%3Cpath%20d%3D%22M0%2016c28%200%2052-6%2084-5s72%2010%20116%205v114H0Z%22%20fill%3D%22%23ffffff%22%2F%3E%3C%2Fg%3E%3Cg%20id%3D%22layer-surge-e49e13db%22%3E%3Cpath%20d%3D%22M0%206c24%200%2044%204%2062%2014%2016%208%2034%208%2052%202%2020-7%2038-12%2054-12%2012%200%2024%204%2032%206v114H0Z%22%20fill%3D%22%23ffffff%22%2F%3E%3C%2Fg%3E%3Cg%20id%3D%22body-quintet-e49e13db%22%3E%3Cg%20opacity%3D%22.14%22%3E%3Cg%20class%3D%22dbwa-l1%22%3E%3Cuse%20transform%3D%22translate(-50)%20translate(21.9728%2C%200.50011)%22%20href%3D%22%23layer-ripple-e49e13db%22%2F%3E%3C%2Fg%3E%3C%2Fg%3E%3Cg%20opacity%3D%22.24%22%3E%3Cg%20class%3D%22dbwa-l2%22%3E%3Cuse%20transform%3D%22translate(-50%2017)%20translate(5.9028%2C%20-4.66596)%22%20href%3D%22%23layer-rolling-e49e13db%22%2F%3E%3C%2Fg%3E%3C%2Fg%3E%3Cg%20opacity%3D%22.34%22%3E%3Cg%20class%3D%22dbwa-l3%22%3E%3Cuse%20transform%3D%22translate(-50%2034)%20translate(-14.5466%2C%201.70495)%22%20href%3D%22%23layer-calm-e49e13db%22%2F%3E%3C%2Fg%3E%3C%2Fg%3E%3Cg%20opacity%3D%22.42%22%3E%3Cg%20class%3D%22dbwa-l4%22%3E%3Cuse%20transform%3D%22translate(-50%2051)%20translate(11.789%2C%20-2.49886)%22%20href%3D%22%23layer-surge-e49e13db%22%2F%3E%3C%2Fg%3E%3C%2Fg%3E%3Cg%20opacity%3D%22.48%22%3E%3Cg%20class%3D%22dbwa-l5%22%3E%3Cuse%20transform%3D%22translate(-50%2068)%20translate(21.0082%2C%202.66877)%22%20href%3D%22%23layer-rolling-e49e13db%22%2F%3E%3C%2Fg%3E%3C%2Fg%3E%3C%2Fg%3E%3Cg%20id%3D%22bodyFree-default-e49e13db%22%3E%3Cuse%20href%3D%22%23body-quintet-e49e13db%22%2F%3E%3C%2Fg%3E%3Cg%20id%3D%22rotation-free-e49e13db%22%3E%3Cuse%20transform%3D%22rotate(-8.8373%2C%2050%2C%2050)%22%20href%3D%22%23bodyFree-default-e49e13db%22%2F%3E%3C%2Fg%3E%3Cg%20id%3D%22animation-none-e49e13db%22%3E%3C%2Fg%3E%3CclipPath%20id%3D%22clip-e49e13db%22%3E%3Crect%20width%3D%22100%22%20height%3D%22100%22%20rx%3D%220%22%20ry%3D%220%22%2F%3E%3C%2FclipPath%3E%3C%2Fdefs%3E%3Cg%20clip-path%3D%22url(%23clip-e49e13db)%22%3E%3Crect%20width%3D%22100%22%20height%3D%22100%22%20fill%3D%22%234338ca%22%2F%3E%3Cuse%20href%3D%22%23rotation-free-e49e13db%22%2F%3E%3Cuse%20href%3D%22%23animation-none-e49e13db%22%2F%3E%3C%2Fg%3E%3C%2Fsvg%3E)



This is the end-to-end workflow for a standard taxable sale:
1. Create the Sales Invoice Create a Sales Invoice in ERPNext as normal. Ensure:
- A Tax Category is selected on the invoice header.
- The Sales Taxes and Charges table is populated with the appropriate tax template.
- All line items have their HS Codes populated (either auto-filled or manually entered).
2. Verify HS Codes Before submitting, confirm that every line item has an HS Code. Invoices with missing HS Codes may fail at the INCOTEX side, requiring manual re-submission.
3. Submit the Invoice Click Submit (or Amend and Submit for amended invoices). Upon submission:
- The integration fires immediately via the
on_submithook. - The invoice data is packaged into a payload according to the INCOTEX API specification.
- The correct endpoint (inclusive or exclusive) is selected based on the tax configuration.
- The payload is sent to INCOTEX via a secure HTTP POST request.
4. INCOTEX Response If the submission is successful, INCOTEX returns:
- A System Invoice Number (INCOTEX's internal reference ID)
- A CU Invoice Number (the official KRA control unit number)
- A Verify URL for KRA's public verification portal
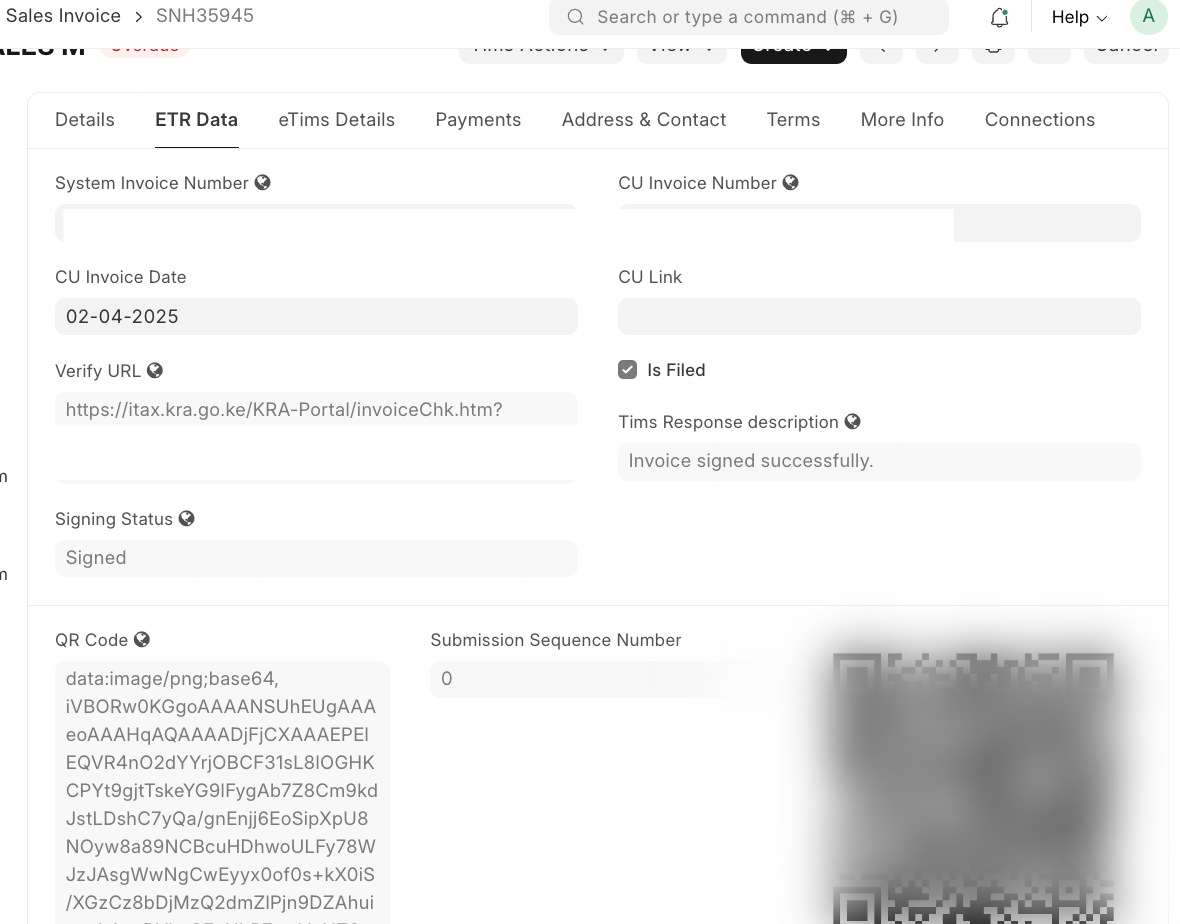 Successful Response
ERPNext immediately updates the invoice with these values. The is_filed checkbox is ticked, and the Verify URL is stored.
5. QR Code Generation A QR code is automatically generated from the Verify URL and stored on the invoice. This QR code must appear on the printed invoice given to the customer.
6. Print Use a custom print format that includes the QR code field to produce a KRA-compliant invoice printout.
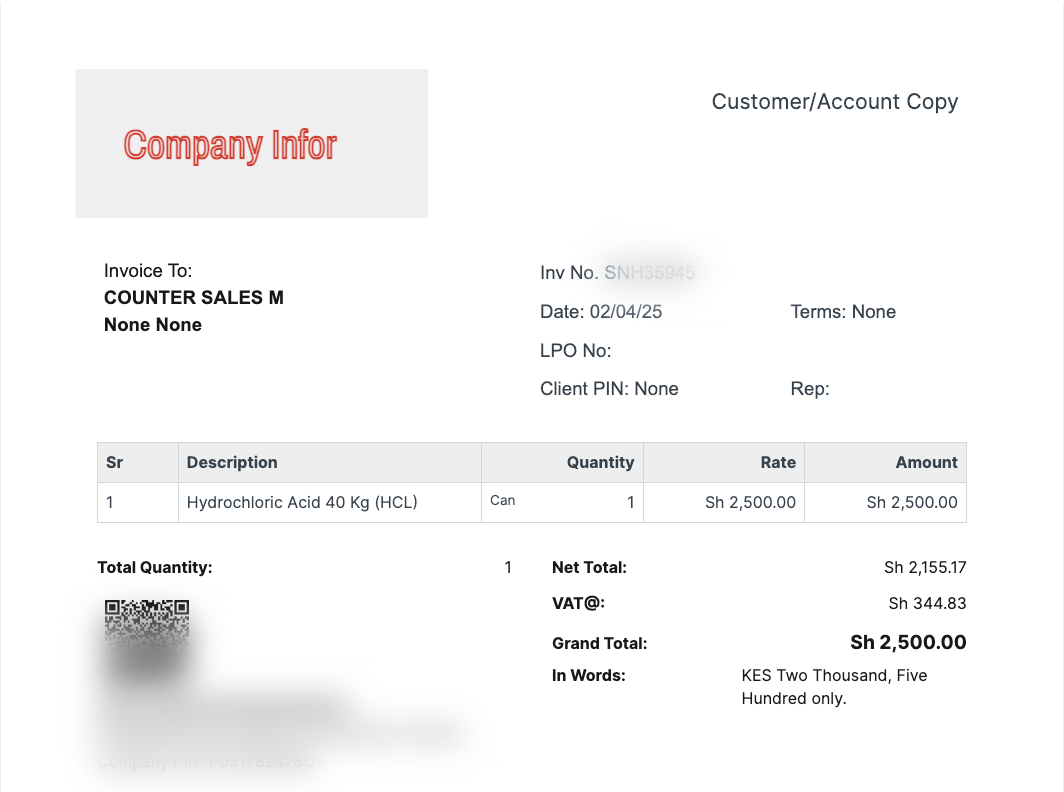 Current Print Format
Note on Print Formats: As of the current release, a standard out-of-the-box print format with the QR code is not yet bundled. Administrators should create a custom print format that references the
verify_urland QR code fields. Frappe's print format builder or Jinja2 HTML templates can be used for this purpose.