
%20--%3E%3Cmetadata%20xmlns%3Ardf%3D%22http%3A%2F%2Fwww.w3.org%2F1999%2F02%2F22-rdf-syntax-ns%23%22%20xmlns%3Axsi%3D%22http%3A%2F%2Fwww.w3.org%2F2001%2FXMLSchema-instance%22%20xmlns%3Adc%3D%22http%3A%2F%2Fpurl.org%2Fdc%2Felements%2F1.1%2F%22%20xmlns%3Adcterms%3D%22http%3A%2F%2Fpurl.org%2Fdc%2Fterms%2F%22%3E%3Crdf%3ARDF%3E%3Crdf%3ADescription%3E%3Cdc%3Atitle%3EWaves%3C%2Fdc%3Atitle%3E%3Cdc%3Acreator%3EDiceBear%3C%2Fdc%3Acreator%3E%3Cdc%3Asource%20xsi%3Atype%3D%22dcterms%3AURI%22%3Ehttps%3A%2F%2Fwww.dicebear.com%3C%2Fdc%3Asource%3E%3Cdcterms%3Alicense%20xsi%3Atype%3D%22dcterms%3AURI%22%3Ehttps%3A%2F%2Fcreativecommons.org%2Fpublicdomain%2Fzero%2F1.0%2F%3C%2Fdcterms%3Alicense%3E%3Cdc%3Arights%3E%E2%80%9CWaves%E2%80%9D%20(https%3A%2F%2Fwww.dicebear.com)%20by%20%E2%80%9CDiceBear%E2%80%9D%2C%20licensed%20under%20%E2%80%9CCC0%201.0%E2%80%9D%20(https%3A%2F%2Fcreativecommons.org%2Fpublicdomain%2Fzero%2F1.0%2F)%3C%2Fdc%3Arights%3E%3C%2Frdf%3ADescription%3E%3C%2Frdf%3ARDF%3E%3C%2Fmetadata%3E%3Cdefs%3E%3Cg%20id%3D%22layer-ripple-e49e13db%22%3E%3Cpath%20d%3D%22M0%2012c6%200%2012%2010%2018%2010s12-10%2018-10%2012%2010%2018%2010%2012-10%2018-10%2012%2010%2018%2010%2012-10%2018-10%2012%2010%2018%2010%2012-10%2018-10%2012%2010%2018%2010%2012-10%2018-10%2012%206%2020%205v113H0Z%22%20fill%3D%22%23ffffff%22%2F%3E%3C%2Fg%3E%3Cg%20id%3D%22layer-rolling-e49e13db%22%3E%3Cpath%20d%3D%22M0%208c12%200%2023%2016%2035%2016S58%208%2070%208s23%2016%2035%2016%2023-16%2035-16%2023%2016%2035%2016c8%200%2017-8%2025-10v116H0Z%22%20fill%3D%22%23ffffff%22%2F%3E%3C%2Fg%3E%3Cg%20id%3D%22layer-calm-e49e13db%22%3E%3Cpath%20d%3D%22M0%2016c28%200%2052-6%2084-5s72%2010%20116%205v114H0Z%22%20fill%3D%22%23ffffff%22%2F%3E%3C%2Fg%3E%3Cg%20id%3D%22layer-surge-e49e13db%22%3E%3Cpath%20d%3D%22M0%206c24%200%2044%204%2062%2014%2016%208%2034%208%2052%202%2020-7%2038-12%2054-12%2012%200%2024%204%2032%206v114H0Z%22%20fill%3D%22%23ffffff%22%2F%3E%3C%2Fg%3E%3Cg%20id%3D%22body-quintet-e49e13db%22%3E%3Cg%20opacity%3D%22.14%22%3E%3Cg%20class%3D%22dbwa-l1%22%3E%3Cuse%20transform%3D%22translate(-50)%20translate(21.9728%2C%200.50011)%22%20href%3D%22%23layer-ripple-e49e13db%22%2F%3E%3C%2Fg%3E%3C%2Fg%3E%3Cg%20opacity%3D%22.24%22%3E%3Cg%20class%3D%22dbwa-l2%22%3E%3Cuse%20transform%3D%22translate(-50%2017)%20translate(5.9028%2C%20-4.66596)%22%20href%3D%22%23layer-rolling-e49e13db%22%2F%3E%3C%2Fg%3E%3C%2Fg%3E%3Cg%20opacity%3D%22.34%22%3E%3Cg%20class%3D%22dbwa-l3%22%3E%3Cuse%20transform%3D%22translate(-50%2034)%20translate(-14.5466%2C%201.70495)%22%20href%3D%22%23layer-calm-e49e13db%22%2F%3E%3C%2Fg%3E%3C%2Fg%3E%3Cg%20opacity%3D%22.42%22%3E%3Cg%20class%3D%22dbwa-l4%22%3E%3Cuse%20transform%3D%22translate(-50%2051)%20translate(11.789%2C%20-2.49886)%22%20href%3D%22%23layer-surge-e49e13db%22%2F%3E%3C%2Fg%3E%3C%2Fg%3E%3Cg%20opacity%3D%22.48%22%3E%3Cg%20class%3D%22dbwa-l5%22%3E%3Cuse%20transform%3D%22translate(-50%2068)%20translate(21.0082%2C%202.66877)%22%20href%3D%22%23layer-rolling-e49e13db%22%2F%3E%3C%2Fg%3E%3C%2Fg%3E%3C%2Fg%3E%3Cg%20id%3D%22bodyFree-default-e49e13db%22%3E%3Cuse%20href%3D%22%23body-quintet-e49e13db%22%2F%3E%3C%2Fg%3E%3Cg%20id%3D%22rotation-free-e49e13db%22%3E%3Cuse%20transform%3D%22rotate(-8.8373%2C%2050%2C%2050)%22%20href%3D%22%23bodyFree-default-e49e13db%22%2F%3E%3C%2Fg%3E%3Cg%20id%3D%22animation-none-e49e13db%22%3E%3C%2Fg%3E%3CclipPath%20id%3D%22clip-e49e13db%22%3E%3Crect%20width%3D%22100%22%20height%3D%22100%22%20rx%3D%220%22%20ry%3D%220%22%2F%3E%3C%2FclipPath%3E%3C%2Fdefs%3E%3Cg%20clip-path%3D%22url(%23clip-e49e13db)%22%3E%3Crect%20width%3D%22100%22%20height%3D%22100%22%20fill%3D%22%234338ca%22%2F%3E%3Cuse%20href%3D%22%23rotation-free-e49e13db%22%2F%3E%3Cuse%20href%3D%22%23animation-none-e49e13db%22%2F%3E%3C%2Fg%3E%3C%2Fsvg%3E)



TIMS Settings Doctype
Once installed, you must configure the integration before it will function. All configuration lives in a single doctype: TIMS Settings.
Navigation: Search Bar → TIMS Settings or ERPNext → Settings → TIMS Settings
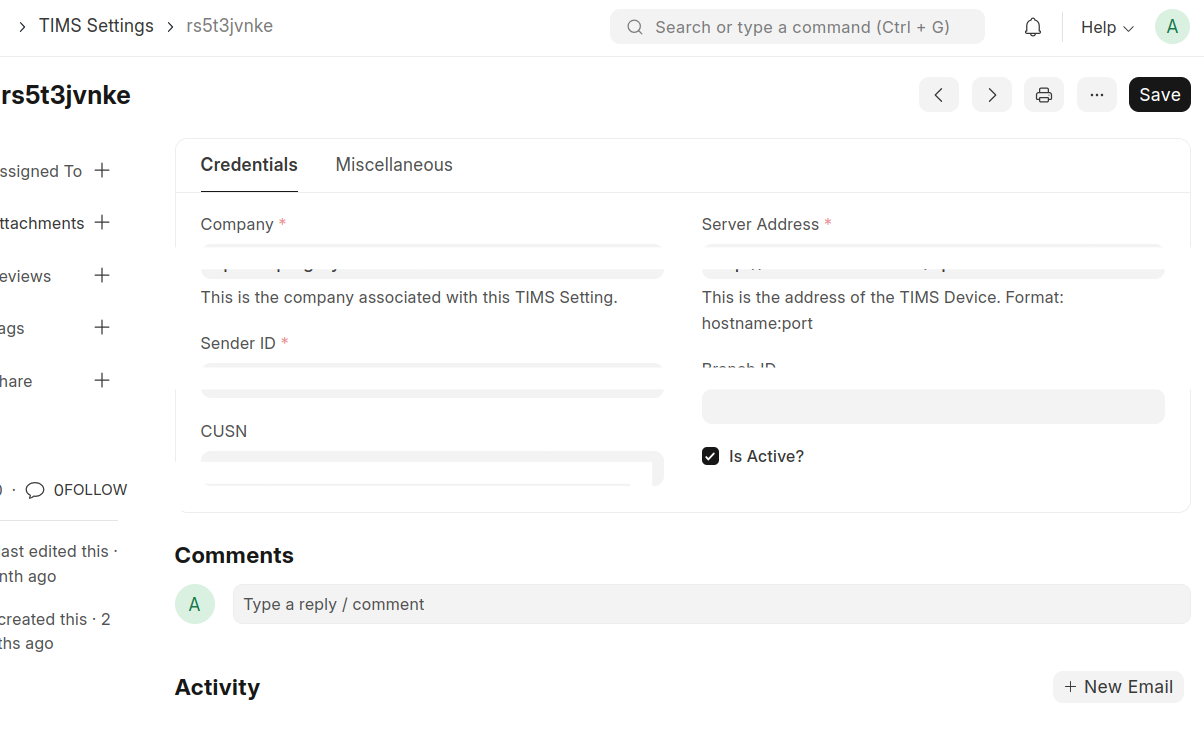 TIMS Settings
Fields Reference
| Field | Type | Description |
|---|---|---|
| Company | Link (Company) | The ERPNext company entity for which this integration is active. If you run multiple companies, each may have its own TIMS Settings record. |
| Server Address | Data | The full API URL provided by Tevin. Use the sandbox URL during testing and switch to production when going live. Example: https://api.tevin.eu/v1/ |
| Sender ID | Data | Your unique Sender ID from Tevin. This is sent as part of every API request header to authenticate your submissions. |
| Is Active | Check | Toggle to enable or disable the integration. Set to checked/active for the integration to submit invoices. If unchecked, no submissions will occur even when invoices are posted. |
Configuration Best Practices
- Always test with the sandbox URL first. Post a few test invoices, confirm the CU numbers and QR codes appear, then switch to the production URL.
- Do not share your Sender ID. Treat it like an API key as it is tied to your KRA registration and Tevin account.
- One TIMS Settings per company. In multi-company ERPNext setups, each legal entity will have its own Tevin credentials. Create separate TIMS Settings records for each.
- Deactivate during migrations. If you are migrating data (bulk-importing historical invoices), temporarily uncheck Is Active to avoid submitting historical invoices to KRA. Re-enable after migration.
Last updated 5 months ago
Was this helpful?