
%20--%3E%3Cmetadata%20xmlns%3Ardf%3D%22http%3A%2F%2Fwww.w3.org%2F1999%2F02%2F22-rdf-syntax-ns%23%22%20xmlns%3Axsi%3D%22http%3A%2F%2Fwww.w3.org%2F2001%2FXMLSchema-instance%22%20xmlns%3Adc%3D%22http%3A%2F%2Fpurl.org%2Fdc%2Felements%2F1.1%2F%22%20xmlns%3Adcterms%3D%22http%3A%2F%2Fpurl.org%2Fdc%2Fterms%2F%22%3E%3Crdf%3ARDF%3E%3Crdf%3ADescription%3E%3Cdc%3Atitle%3EWaves%3C%2Fdc%3Atitle%3E%3Cdc%3Acreator%3EDiceBear%3C%2Fdc%3Acreator%3E%3Cdc%3Asource%20xsi%3Atype%3D%22dcterms%3AURI%22%3Ehttps%3A%2F%2Fwww.dicebear.com%3C%2Fdc%3Asource%3E%3Cdcterms%3Alicense%20xsi%3Atype%3D%22dcterms%3AURI%22%3Ehttps%3A%2F%2Fcreativecommons.org%2Fpublicdomain%2Fzero%2F1.0%2F%3C%2Fdcterms%3Alicense%3E%3Cdc%3Arights%3E%E2%80%9CWaves%E2%80%9D%20(https%3A%2F%2Fwww.dicebear.com)%20by%20%E2%80%9CDiceBear%E2%80%9D%2C%20licensed%20under%20%E2%80%9CCC0%201.0%E2%80%9D%20(https%3A%2F%2Fcreativecommons.org%2Fpublicdomain%2Fzero%2F1.0%2F)%3C%2Fdc%3Arights%3E%3C%2Frdf%3ADescription%3E%3C%2Frdf%3ARDF%3E%3C%2Fmetadata%3E%3Cdefs%3E%3Cg%20id%3D%22layer-ripple-e49e13db%22%3E%3Cpath%20d%3D%22M0%2012c6%200%2012%2010%2018%2010s12-10%2018-10%2012%2010%2018%2010%2012-10%2018-10%2012%2010%2018%2010%2012-10%2018-10%2012%2010%2018%2010%2012-10%2018-10%2012%2010%2018%2010%2012-10%2018-10%2012%206%2020%205v113H0Z%22%20fill%3D%22%23ffffff%22%2F%3E%3C%2Fg%3E%3Cg%20id%3D%22layer-rolling-e49e13db%22%3E%3Cpath%20d%3D%22M0%208c12%200%2023%2016%2035%2016S58%208%2070%208s23%2016%2035%2016%2023-16%2035-16%2023%2016%2035%2016c8%200%2017-8%2025-10v116H0Z%22%20fill%3D%22%23ffffff%22%2F%3E%3C%2Fg%3E%3Cg%20id%3D%22layer-calm-e49e13db%22%3E%3Cpath%20d%3D%22M0%2016c28%200%2052-6%2084-5s72%2010%20116%205v114H0Z%22%20fill%3D%22%23ffffff%22%2F%3E%3C%2Fg%3E%3Cg%20id%3D%22layer-surge-e49e13db%22%3E%3Cpath%20d%3D%22M0%206c24%200%2044%204%2062%2014%2016%208%2034%208%2052%202%2020-7%2038-12%2054-12%2012%200%2024%204%2032%206v114H0Z%22%20fill%3D%22%23ffffff%22%2F%3E%3C%2Fg%3E%3Cg%20id%3D%22body-quintet-e49e13db%22%3E%3Cg%20opacity%3D%22.14%22%3E%3Cg%20class%3D%22dbwa-l1%22%3E%3Cuse%20transform%3D%22translate(-50)%20translate(21.9728%2C%200.50011)%22%20href%3D%22%23layer-ripple-e49e13db%22%2F%3E%3C%2Fg%3E%3C%2Fg%3E%3Cg%20opacity%3D%22.24%22%3E%3Cg%20class%3D%22dbwa-l2%22%3E%3Cuse%20transform%3D%22translate(-50%2017)%20translate(5.9028%2C%20-4.66596)%22%20href%3D%22%23layer-rolling-e49e13db%22%2F%3E%3C%2Fg%3E%3C%2Fg%3E%3Cg%20opacity%3D%22.34%22%3E%3Cg%20class%3D%22dbwa-l3%22%3E%3Cuse%20transform%3D%22translate(-50%2034)%20translate(-14.5466%2C%201.70495)%22%20href%3D%22%23layer-calm-e49e13db%22%2F%3E%3C%2Fg%3E%3C%2Fg%3E%3Cg%20opacity%3D%22.42%22%3E%3Cg%20class%3D%22dbwa-l4%22%3E%3Cuse%20transform%3D%22translate(-50%2051)%20translate(11.789%2C%20-2.49886)%22%20href%3D%22%23layer-surge-e49e13db%22%2F%3E%3C%2Fg%3E%3C%2Fg%3E%3Cg%20opacity%3D%22.48%22%3E%3Cg%20class%3D%22dbwa-l5%22%3E%3Cuse%20transform%3D%22translate(-50%2068)%20translate(21.0082%2C%202.66877)%22%20href%3D%22%23layer-rolling-e49e13db%22%2F%3E%3C%2Fg%3E%3C%2Fg%3E%3C%2Fg%3E%3Cg%20id%3D%22bodyFree-default-e49e13db%22%3E%3Cuse%20href%3D%22%23body-quintet-e49e13db%22%2F%3E%3C%2Fg%3E%3Cg%20id%3D%22rotation-free-e49e13db%22%3E%3Cuse%20transform%3D%22rotate(-8.8373%2C%2050%2C%2050)%22%20href%3D%22%23bodyFree-default-e49e13db%22%2F%3E%3C%2Fg%3E%3Cg%20id%3D%22animation-none-e49e13db%22%3E%3C%2Fg%3E%3CclipPath%20id%3D%22clip-e49e13db%22%3E%3Crect%20width%3D%22100%22%20height%3D%22100%22%20rx%3D%220%22%20ry%3D%220%22%2F%3E%3C%2FclipPath%3E%3C%2Fdefs%3E%3Cg%20clip-path%3D%22url(%23clip-e49e13db)%22%3E%3Crect%20width%3D%22100%22%20height%3D%22100%22%20fill%3D%22%234338ca%22%2F%3E%3Cuse%20href%3D%22%23rotation-free-e49e13db%22%2F%3E%3Cuse%20href%3D%22%23animation-none-e49e13db%22%2F%3E%3C%2Fg%3E%3C%2Fsvg%3E)



4.1 ZKTeco Device Setup
Before configuring the integration, verify the following on the physical device:
- The device is powered on and connected to the same network (or a routable network) as the Frappe server.
- The device's IP address is static or reserved via DHCP, so it does not change between syncs.
- The device's admin username and password are known.
- The REST API (ICLOCK interface) is enabled on the device. Most ZKTeco devices running firmware version 6.60 and above expose this by default.
- Ports are open: test reachability with
curl http://{device_ip}/iclock/api/transactions/from the Frappe server before proceeding.
4.2 ZKTeco Biometric Settings Doctype
Navigate to: ZKTeco Biometric Integration > ZKTeco Biometric Settings
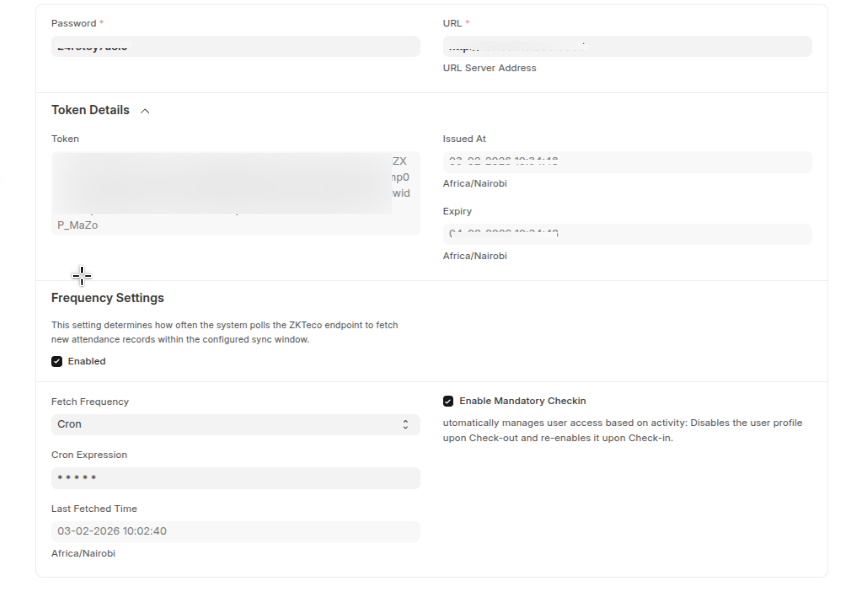 ZKTeco Biometric Settings
Each settings document represents one ZKTeco device. You can create multiple settings documents to manage multiple devices.
| Field | Description | Example |
|---|---|---|
| Username | Admin username for the ZKTeco device. Must be unique per device. | admin |
| Password | Admin password for the ZKTeco device. | Admin1234 |
| URL | Base URL of the device, including scheme and IP. Do not include a trailing slash. | http://192.168.1.100 |
| Fetch Frequency | How often the scheduler pulls data from this device. See options below. | Hourly |
| Enable | Toggle to activate or pause this integration without deleting the settings. | Checked |
Fetch Frequency options:
| Option | Behaviour |
|---|---|
| All (Continuous) | Runs on every scheduler tick (approximately every minute). Use with caution on large deployments. |
| Hourly | Runs once per hour. |
| Daily | Runs once per day. |
| Weekly | Runs once per week. |
| Monthly | Runs once per month. |
| Custom Cron | Accepts a standard cron expression for precise scheduling (e.g., */15 * * * * for every 15 minutes). |
4.3 JWT Token Management
Saving the ZKTeco Biometric Settings document triggers automatic token generation. The system:
- POSTs the configured credentials to the device's auth endpoint.
- Stores the returned JWT token internally.
- Includes the token in the
Authorization: JWT <token>header on all subsequent requests. - Detects
401 Unauthorizedresponses and re-authenticates transparently before retrying.
You do not need to manually manage tokens. If authentication fails persistently, re-save the settings document to trigger a fresh token request, and verify credentials are correct.
4.4 Employee Biometric ID Mapping
Each employee in FrappeHR must have their Biometric ID set to the ID registered for them on the ZKTeco device.
- Open the Employee master record.
- Locate the Biometric ID field (under the Attendance section, or as a custom field depending on your HR configuration).
- Enter the exact numeric or alphanumeric ID that matches what the device records in the
emp_codefield of its punch transaction log.
Requirements:
- The Biometric ID must be unique across all employee records.
- It must match exactly no leading/trailing spaces, no formatting differences.
- If an employee is registered on multiple devices, the same Biometric ID must be used on all devices.
If an employee's Biometric ID is missing or does not match any punch record's emp_code, that employee's punches will be silently skipped. Check the Error Logs for Employee Not Found entries to identify mismatches.
4.5 Shift Assignment
The FrappeHR attendance processing pipeline (which converts raw Check-in records into Attendance documents) depends on employees having shifts assigned. Assign the appropriate Shift Type to each employee under the Employee master or via Shift Assignment before expecting attendance to be processed correctly from the synced data. The integration itself creates raw Employee Check-in records; shift resolution is handled downstream by FrappeHR's standard attendance automation.